Posts Tagged ‘Publishing’


Fatwire Interview Questions:

Fatwire Interview Questions” is one of the most frequently googled search term in Google. Hence, I’m coming today with a list of Fatwire Interview questions. The same will be applied for Oracle WebCenter Sites as-well.

Note: These are the questions which I’ve faced from most of the interviewers.

  1. What are the different versions of Fatwire that you have worked on?
  2. Explain difference between Basic Asset Model and Flex Asset Model?
  3. Explain difference between CSElement and Template?
  4. Explain about templates and its need in Fatwire CMS?
  5. Explain how will you handle multi-level languages in Fatwire?
  6. Explain about Asset and Asset Type?
  7. Explain about the Basic Asset Model?
  8. Explain about the Flex Asset Model?
  9. Explain about Rendering?
  10. Explain about different Publishing methodologies?
  11. Explain about the types of publishing Fatwire supports?
  12. Explain about Roles and ACLs?
  13. Explain about Attribute Editors and how will you create Attribute Editors?
  14. Explain about Workflow?
  15. Explain about the default asset types of Fatwire?
  16. Explain the use of Page Asset Type in Fatwire CMS?
  17. Explain the use of CSElement, SiteEntry and Template Asset Types?
  18. When will you use asset:getattributevalues and assetset:getmultiplevalues?
  19. What are the limitations of the tag assetset:getmultiplevalues?
  20. What is the difference between asset:list and assetset:getassetlist tag?
  21. How will you perform Error handling in JSP?
  22. What happens behind the scene when I hit an URL and invoke a page in Fatwire CMS?
  23. I want to know how many flex assets are available in my Article AssetType. Is it possible to know that? If so, how can we know that?
  24. Explain about the Recommendations, Collections, Queries, Segment, and Promotion?
  25. How to re-use the asset types that are present in one site, in another site?
  26. Explain about XMLPost and BulkLoader utilities?

Happy Job Hunting…. 


Dynamic Publishing is the process of publishing the content (assets) to some other machine/destination. This Dynamic Publishing is of two types.

1. Mirror to Server : Mirror to Server is the method used to copy database rows to remote dynamic server

2. Real time Publishing : Real time Publishing is the method used to copy assets to remote dynamic server.

Out of these both, Mirror to Server is the one which is used mostly. Mirror to Server is built with the Content Server Mirror API to copy approved assets from the Content Server database on one system to the Content Server database on another system.

CREATION OF DYNAMIC PUBLISH DESTINATION:

The following steps are involved in the creation of a DYNAMIC PUBLISHING DESTINATION:

  • Login to the Advanced user interface.
  • Go to the admin tab of the tree.
  • Expand PUBLISHING -> DESTINATIONS.
  • Click on ADD NEW. The following screen appears:

  • In the “DELIVERY TYPE” drop down, select “MIRROR TO SERVER: Copy database rows to remote dynamic server”.
  • Enter a name for the publishing destination in NAME field
  • In the “DESTINATION ADDRESS” field, enter the name of the server, its port, followed by “/cs/”. For example, if  http://samplenode.com:8080/cs/Xcelerate/LoginPage.html  is the page which you use for logging into the advanced UI (URL of Remote Server), then the Destination address would look like this http://samplenodecom:8080/cs/
  • Enter the user name in “REMOTE USER” field.
  • Enter the password in “REMOTE PASSWORD” field.
  • Select the roles which approve the assets for publishing to this location.
  • Select the roles which can publish to this destination.
  • Select the sites for which this destination will be available.
  • Click on ADD NEW DESTINATION button in the bottom.

In this way, the Dynamic Publishing destination can be created.

Once the dynamic destination has been created, we need to check whether the destination is working properly or not. This can be known by observing the GREEN BULB image seen as shown in the image below. If a RED BULB image is shown, then there is some problem in connecting to the destination, like network issues, remote server might be down, licensing issues of the remote server for fatwire, VPN connectivity issues, etc. If any of the above issues arise, you need to consult the Fatwire / System Administrator of your company.

In this way, the Mirror to Server destination needs to be created and configured.

The rest of the APPROVAL, STATUS, PUBLISHING process is same as Static Publishing.


In our previous posts, we have seen how to work with Static Publishing. In this post, we will see how to work with Dynamic Publishing.

DYNAMIC PUBLISHING, also known as MIRROR TO SERVER PUBLISHING method, is one of the important Publishing methodologies of Fatwire. It is built with the Content Server Mirror API to copy approved assets from the Content Server database on one system to the Content Server database on another system.

HOW IT WORKS:

The following image explains how the Mirror to Server publishing works in simple.

To be more precise,

1. When the Dynamic Publishing is done, the Local content server (on which the main database, file structure, etc are there) mirrors,i.e, copies the entire file structure to the remote server (the machine which hosts the site).

2. The user requests a page.

3. The request will be received by the server (i.e, the mirrored remote CS Server).

4. The CS dynamically generates the pagelets and pages, and delivers it to the webserver.

5. The webserver then delivers it to the end user who has requested the page.


In my previous post, we have seen the creation of Static Publishing destination. In this post, and if required in the upcoming posts, we will discuss on how to work with this static publishing.

Static Publishing or Export to Disk Publishing, as quoted by the Fatwire Developer guide, “It renders your approved assets into static HTML files, using the template elements assigned to them to format them. An administrator or automated process then copies those files to your delivery system using FTP or another file transfer method.”

The Static Publishing is mainly used when the Basic Asset Model is used. While using the Flex Asset model, it rarely makes sense to use this Static Publishing methodology.

APPROVING THE ASSETS:

After the asset is created (lets take a PAGE asset here) , and a default template is assigned, we need to APPROVE the asset for making it available for PUBLISH.

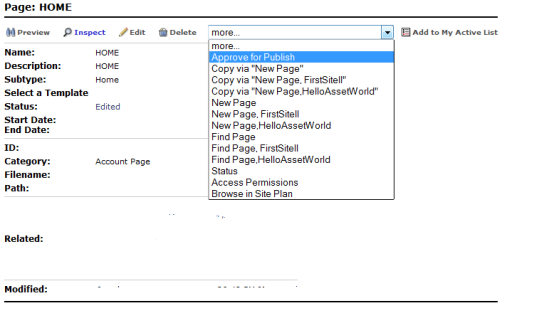
To approve an asset, click on INSPECT action item of the asset (a Page here). Then click on MORE drop down list, and then click on “APPROVE FOR PUBLISH”. Check the below screen for the same.

image

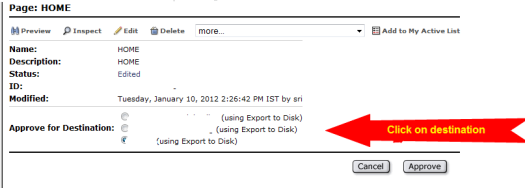
Now, The next step to proceed with is to select the Publishing destination(If not created earlier, check out this link for creation of Static Publishing Destination). Select the appropriate publishing destination, if you have created more than one. Then click on the Approve button. Check the below screen for the same.

image

If the asset has any dependencies, those dependencies have to be approved first, before approving this asset.

That’s it.. The asset is Approved.

SETTING STATUS OF ASSETS:

If the assets are published directly, with out setting a specified file name, they will be exported with the ASSET’S ID by default. To avoid that, we need to specify a user friendly name. The STATUS screen helps us in setting a user friendly name for the asset, path for the asset (under the exported directory), and a starting point for the asset.

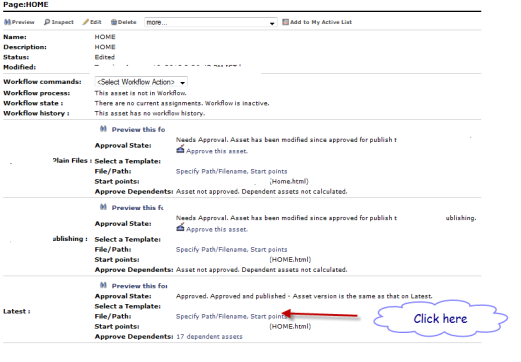
For setting the status, click on STATUS option of the MORE drop down menu. Then the following screen appears. Click on the “SPECIFY PATH/FILENAME, START POINTS” link in the appropriate publishing destination.

image

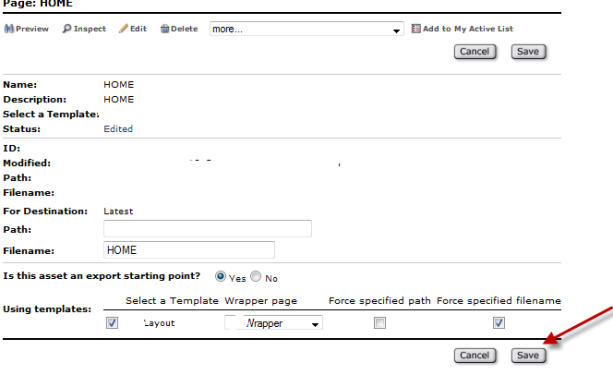
The next screen is the place where we need to set the above discussed (Path, File name, Starting points).

  1. Specify the Path and filename.
  2. If the asset needs to be published, it needs to be a starting point.  For example, if Page is a starting point, then the all the images, css, etc will automatically be exported by the page.
  3. Select the template and the wrapper page.
  4. Click on Save.

Check the below screen for the same.

image

PUBLISHING THE ASSETS:

Now, the final thing to do is to publish the assets. Click on the PUBLISHING option in the top of the work area. The following screen appears. Select the appropriate publishing destination. Check the below screen for the same.

image

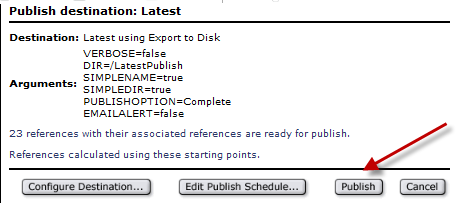
The following screen appears next.  In that, we need to click on PUBLISH button.

image

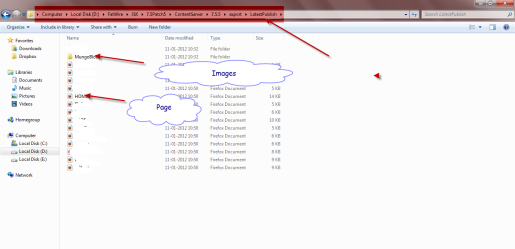
To make sure that the files are exported correctly, we need to go to the export location, and check whether they are exported properly or not.

image

In this way, the  assets are exported successfully to the specified location.

This is STATIC PUBLISHING or EXPORT TO DISK PUBLISHING.

Stay tuned for more posts…


The STATIC Publishing method, other wise called as EXPORT TO DISK publishing method is a best option, especially when we want to export the files to the file system on the same machine on which the content server is residing. It exports the rendered html files (or any other files that are approved) to the location specified by the user. For example, if we want to export the html, css, js, etc files to an application server residing on the same machine as the content server, we should follow the Static Publishing method. In this topic, we are going to discuss how we should create a static destination, and how to publish (export) the files.

CREATION OF STATIC PUBLISH DESTINATION:

The following steps are involved in the creation of a STATIC PUBLISHING DESTINATION:

  • Login to the Advanced user interface.
  • Go to the admin tab of the tree.
  • Expand PUBLISHING -> DESTINATIONS.
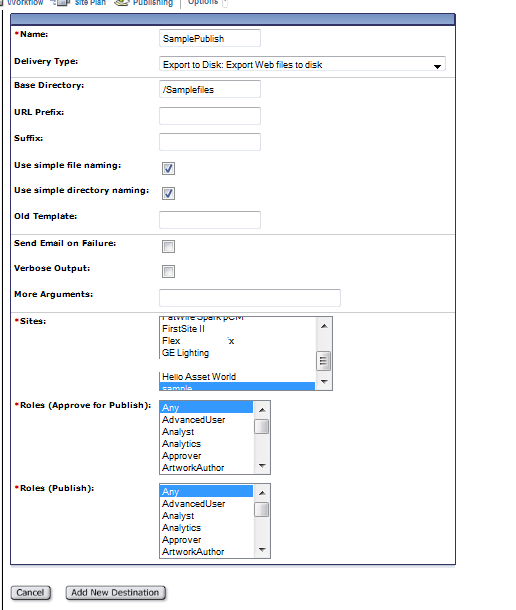
  • Click on ADD NEW. The following screen appears:

image

  • In the “DELIVERY TYPE” drop down, select “EXPORT TO DISK: EXPORT WEB FILES TO DISK”.
  • Enter a name for the publishing destination in NAME field
  • The BASE DIRECTORY is the directory into which the files will be exported. For Jump Start kit, the following is the default location into which the files will be exported: <Drive>:\FatWire\JSK\7.5Patch5\ContentServer\7.5.5\export. If we give a name, a new directory will be created under the export folder specified above.
  • Select the roles which approve the assets for publishing to this location.
  • Select the roles which can publish to this destination.
  • Select the sites for which this destination will be available.
  • Click on ADD NEW DESTINATION button in the bottom.

That’s it, the publishing destination is created for Static Publishing.

In the next few posts, we are going to know how to work this Static Publishing.


What is RENDERING?

Content Server page is a set components that have been assembled into a viewable, final output. Creating that output is called RENDERING.

What is PUBLISHING?

Making either that output or the content that is to be rendered available to the visitors of your online site is called PUBLISHING.

Once we are done with the development of the Site with all the required assets such as Templates, articles, pages, Flex/Basic assets, we need to PUBLISH them to the production system, i.e., When the content on the management system is ready, you publish it to the delivery (Production) system. After intensive testing – both performance and load, you open your site to the public.

Following are the various Publishing Methods available in Fatwire:

1. Export to Disk (Static Publishing) – Export web files to disk (File system).

2. Mirror to Server (Dynamic Publishing) – Copy database rows to remote dynamic server.

3. Export to XML – Export an XML file for each asset.

4. Real Time – Copy assets to remote dynamic server.

In the upcoming posts, We will discuss regarding the above listed Publishing methods of Fatwire.