In AEM environment, it is common to have both Author and Publish instances, except where the business requirement doesn’t require any publish environment.

Today we will see what is replication, and how it is useful.

Once authors have created content in author servers, and reviewed it, the ultimate goal is to make it available on the website, which is hosted through publish environment.

This process of making the content available to the public by publishing from author to publish instance is called “Publishing / Activation / Replication”.

What is Replication / Activation / Publishing:
Publish

General terms for the actions that make your pages/content publicly available on your publish environment. This can be done from either Sites console by authors, or from CRXDE by developers

Un-Publish

General terms for the actions that revoke your pages/content from publish environment.

Activation / Deactivation

These are synonymous with publish/un-publish.

Replicate / Replication

Technical terms describing the movement of content from one environment (author/publish) to another (publish/author) such as when publishing content or reverse-replicating user comments.

The replication and reverse-replication agents can be configured at the following url:

http://local-author.com:4502/etc/replication.html

Screen Shot 2018-07-11 at 4.36.44 PM

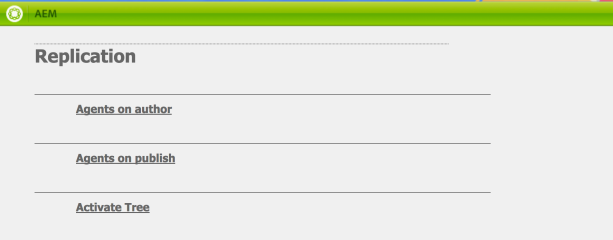
The above screen shows three links by default.
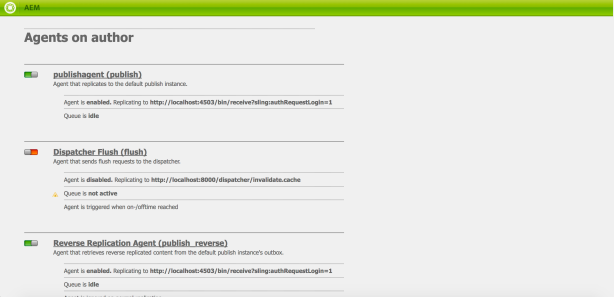
Agents on Author:

They are the replication agents that are configured on your author server. Basing on the instance (i.e, whether author or publish), you will be either using “Agents on Author” or “Agents on Publish”.

To configure the replication agents for publish environment, we will use the “Agents on Author”. Content can be replicated to more than one publish server. So we can configure more than one replication agent in this screen.
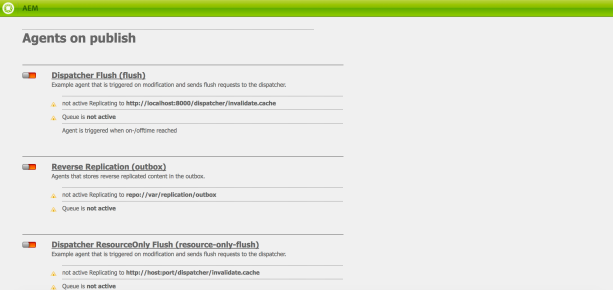
Screen Shot 2018-07-11 at 4.38.32 PM.png

Agents on Publish:

To configure the reverse replication from publish to author, we will use “Agents on Publish”
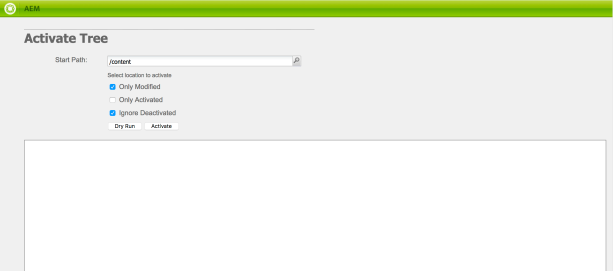
Screen Shot 2018-07-11 at 4.38.25 PM.png

Activate Tree

To activate any node from author to publish, we use this feature. This will publish the node along with all the child nodes under the path specified in “Start Path:”

Screen Shot 2018-07-11 at 4.45.11 PM.png

In the next post, we will see how to configure Replication agents.


This article explains how to create an application/project in AEM using CRXDE Lite. The application/project is an area where we build the AEM elements (Templates, Components, etc.). To successfully complete and understand these instructions, you will need a running CQ5 Author instance

What is CRXDE Lite?

CRXDE Lite comes out of the box, and is embedded into Adobe Experience Manager. It enables us to perform standard development tasks in the browser. With CRXDE Lite, we can create different AEM projects, create and edit jsp, html, java files, folders, templates, components, dialogs, nodes, properties and bundles while logging and integrating with SVN.

What is an application/project?

An application/project  in AEM is where we store all the AEM elements such as Templates, Components, , and static files such as CSS, JS, etc. To start a new application/ project, it is necessary to define a location for these elements. In general, they are created as a sub folder of the /apps folder. It is recommended that we create the following structure for our application/project:

/apps/<our application name>   –  The Application / Project

/apps/<our application name>/ components    –  All the AEM Components go here.

/apps/<our application name>/ components/page  – All the page components go here

/apps/<our application name>/ components/global  -All the Global components go here

/apps/<our application name>/templates – All the Templates should go here.

/apps/<our application name>/src  –  All the OSGi bundles should go here.

/apps/<our application name>/install   –  All the Compiled OSGi bundles should go here.

Create Application / Project:

1. Right-click on the apps folder and then select Create -> Create Folder

2. A new dialog box opens where we need to enter the folder name. This will be your project name

3. Create structure as mentioned above, like templates, components, etc.

4. Click Save. Note that without clicking on the saving button, the existing changes wouldn’t be saved.

5. Congratulations! You have successfully created an application/project and related structure in AEM

screen-shot-2017-02-16-at-11-57-17-am

We have discussed about the basics of Apache Sling in the last article. Now we will see a  quick cheat sheet on how the sling resolution takes place. Really helpful for understanding how the script for the requested content is resolved in Adobe Experience Manager (AEM).

Disclaimer: This image is actually shared from AEM website, and is not created by my own.

sling-cheatsheet


Apache Sling is one of the core technologies used in Adobe Experience Manager (formerly known as Adobe CQ / Day CQ).

Sling started as an internal project at Day Software, and taken up by Apache in September 2007. It’s the reason why some bundles/libraries are named like com.day.

The other important technologies include Apache Jackrabbit, Apache Felix, OSGi. We will discuss about the Apache Sling in this article, and how to create a sample content and consume it.

Apache Sling is a web framework that uses a Java Content Repository (like Apache Jackrabbit) to store and manage content. Sling applications use either scripts or Java servlets to process HTTP requests in a RESTful way.

Sling in very simple terms could be described as a REST API for JCR. We can use http requests to manage content inside the repository. Sling provides a mechanism to render that content in different ways. We can use JSP, ESP scripts, Java (servlets, pojos, etc) in the Felix container to process requests and deliver content.

When a request is made for a particular node, Sling looks up for a property called sling:resourceType. This is used to look up the rendering scripts for the requested resource.

Apache Sling is:

  • a REST based web framework
  • Content-driven, using JCR
  • Powered by OSGi framework
  • an Apache Open Source project

We shall see an example of how to start, create node and read the node’s content from Sling.

  1. Download Apache Sling Launchpad self-runnable jar from https://sling.apache.org/downloads.cgi. In my case, I have downloaded the latest jar org.apache.sling.launchpad-8.jar
  2. After the jar is downloaded, just start it as follows:
    java -jar org.apache.sling.launchpad-8.jar
  3. This starts the Sling embedded Web Server on port 8080 and writes application files into the sling folder found in the current working directory of your choice. You can check http://localhost:8080/system/console/bundles to see if the application is started properly or not. The credentials would be admin/admin. Here you would see different bundles in started state.
  4. Create content by giving the below cUrl command:
    curl -u admin:admin -F "sling:resourceType=training/aem" -F "title=Sling for AEM" http://localhost:8080/content/myaemnode

            We can expect a response as below:

Screen Shot 2016-07-26 at 6.42.54 PM

Now check the content by using the below URLs from web browser.

Content node in HTML format: http://localhost:8080/content/myaemnode.html

Screen Shot 2016-07-26 at 6.46.47 PM

Same node in JSON format: http://localhost:8080/content/myaemnode.json

Screen Shot 2016-07-26 at 6.45.52 PM


The AEM Developer Tools is a plugin for Eclipse IDE that brings you the full connection to the Adobe Experience Manager. It is based on the Eclipse plugin for Apache Sling.

Using this plugin, you can directly work with the AEM repository.

The latest version of AEM Developer Tools plugin can be downloaded at https://eclipse.adobe.com/aem/dev-tools/

More information about how to install the plugin can be found at https://docs.adobe.com/content/docs/en/dev-tools/aem-eclipse.html

Screen Shot 2016-04-14 at 7.05.31 PM


Template:

A Template is used to create a Page and defines which components can be used within the selected scope. A Template is a hierarchy of nodes that has the same structure as the page to be created, but without any actual content. Each Template will present you with a selection of components available for use.

Templates are built up of Components. Components use, and allow access to, Widgets, which are used to author/render content. A Template is the basis of a Page. To create a Page, the Template’s content must be copied (/apps/<application name>/templates/<template name>) to the corresponding position in the site-tree.

CRXDE Lite:

CRXDE Lite is embedded into CQ5/CRX and enables you to perform standard development tasks in a Web browser. With CRXDE Lite, you can create and edit files (e.g. JSP, Java, HTML, etc.), folders, Templates, Components, Dialogs, nodes, properties, and bundles; all while logging and integrating with SVN.

CRXDE Lite is recommended when you do not have direct access to the CQ/CRX server, when you develop an application by extending or modifying the out-of-the-box Components and Java bundles, or when you do not need a dedicated debugger, code completion and syntax highlighting.

Page-rendering Component:

Components are modular, re-usable units that implement specific functionality/logic to render the content of your Web site. They have no hidden configuration files, can include other Components, and can run anywhere within CQ5 or in isolation (e.g. portal).

A Component could be described as a collection of scripts (e.g. JSPs, Java servlets, etc.) that completely realize a specific function. More specific, a “Page” Component is typically referenced by a Template.

Page:

A Page is where content authors will create and edit content that will most likely be published and viewed by site visitors. It is an exact copy of the Template from which it was created.


The structure of Adobe Experience Manager implementation can be divided as follows, from lowest to highest level

  • Java Platform
    • Java Runtime Environment (JRE 1.6 minimum. JRE 1.7 recommended)
  • Granite Platform (runs on JRE)
    • OSGi Framework
    • CQSE Servlet Engine
    • CRX Content Repository
    • Sling Content Delivery
    • Granite UI
  • Abobe Experience Manager (which runs on Granite platform, within OSGi framework)
    • Individual AEM modules like:
      • WCM
      • DAM
      • Workflow, etc..
  • Customer Applications (these run on AEM)
    • Other Customer specific applications (websites, etc. also run within OSGi framework)AEM Architecture

Open Systems Gateway Initiative (OSGI)

OSGi has developed a specification to build modular and extensible applications. The OSGi module system allows building applications as a set of reloadable and strongly encapsulated services. OSGi “bundles” run inside an “OSGi container”, which manages relations among bundles. Again, bundles are simply JAR files that contain extra metadata indicating what services they require and which they provide.

OSGi Framework

The OSGi Framework is made up of three layers which define how extensible applications are built and deployed.

  • Module
  • Lifecycle
  • Services.

The responsibilities of the layers are:

1. Module:

Defines how a module, or a Bundle in OSGi is defined. Basically, a bundle is just a plain old JAR file, whose manifest file has some defined entries. These entries identify the bundle with a symbolic name, a version and more. In addition there are headers which define what a bundle provides – Export-Package – and what a bundle requires to be operative – Import-Package and Require-Bundle.

2.Lifecycle:

The lifecycle layer defines the states a bundle may be in and describes the state changes. By providing a class, which implements the BundleActivator interface and which is named in the Bundle-Activator manifest header, a bundle may hook into the lifecycle process when the bundle is started and stopped.

3. Services:

For the application to be able to interact, the OSGi Core Specification defines the service layer. This describes a registry for services, which may be shared.

Sample Manifest information:

Export-Package: *
Import-Package: *
Private-Package: *
# Include-Resource: 
Bundle-Name: Workflow Purge
Bundle-Description: Allow automatic & scheduled purge of workflows
Bundle-SymbolicName: com.adobe.daycare.workflow.purge
Bundle-Version: 1.7.1
Bundle-Activator: com.adobe.daycare.workflow.purge.Activator


Apache Sling

Apache Sling is a web framework that uses a Java Content Repository, such as Apache Jackrabbit or Adobe CRX to store and manage content. Sling applications use either scripts or Java servlets to process HTTP requests in a RESTful way. The Sling application is built as a series of OSGi bundles and makes heavy use of a number of OSGi services. Being a REST framework, Sling is oriented around resources, which usually map into JCR nodes.

Traditional web applications select processing script based on the URL, and then attempt to load data to render a result.

In Apache Sling,  request URL is first resolved to a resource, then based on the resource it selects the actual servlet or script to handle the request.

The Resource is one of the central parts of Sling. Sling assumes that “Everything is a Resource”. Sling resources usually map to a JCR node.

Every script, servlet, filter, error handler, etc. is available from the ResourceResolver just like normal content providing data to be rendered upon requests, and they are accessible by a resource path.

Using Sling, the type of content to be rendered is not the first processing consideration. Instead the main consideration is whether the URL resolves to a content object for which a script can then be found to perform the rendering.

In Sling, and therefore also in AEM, processing is driven by the URL of the HTTP
request. This defines the content to be displayed by the appropriate scripts. To do this, information is extracted from the URL. When the appropriate resource (content node) is located, the resource type is extracted from the resource properties. The sling:resourceType property is a path, which locates the script to be used for rendering the content.


Welcome Page: http://server:port/libs/cq/core/content/welcome.html

Site Admin: http://server:port/siteadmin

CRX explorer: http://server:port/crx/explorer/index.jsp

CRX DE Lite:  http://server:port/crx/de

Workflow Management: http://server:port/libs/cq/workflow/content/console.html

System Console: http://server:port/system/console

User Management:  http://server:port/libs/granite/security/content/useradmin.html

Group Management:  http://server:port/libs/granite/security/content/groupadmin.html

JVM Memory usage:  http://server:<port/system/console/memoryusage

JVM Runtime Properties:  http://server:port/system/console/jmx/java.lang:type=Runtime

System Information:  http://server:port/system/console/vmstat

Product Version and License Information:  http://server:port/system/console/productinfo

OSGi Bundle Configuration:  http://server:port/system/console/configMgr

List of Backups: http://server:port/libs/granite/backup/content/admin.html

Package Share:  http://server:port/crx/packageshare

Replication Management:  http://server:port/etc/replication.html

Replication Agents on Author: http://server:port/etc/replication/agents.author.html

Replication Agents on Publish: http://server:port/etc/replication/agents.publish.html

Tagging:   http://server:port/tagging

Sling properties: http://server:port/system/console/status-slingsettings

Version Purge:  http://server:port/etc/versioning/purge.html


Like every product, AEM might also have some bugs/performance issues. These are solved by supplying hot fixes (simply like patches in Oracle WebCenter Sites) to the specific AEM version.

The Hot fixes for AEM 6.1 can be found at the below url

https://helpx.adobe.com/experience-manager/kb/aem61-available-hotfixes.html

How to apply these AEM Hot Fixes?

The hot fixes can be applied either through the package share or manually.

AEM 6.1 introduced the concept of deploying the Hotfixes manually. We will now see how to deploy the downloaded hotfixes manually.

1.   Login to the server

2.   Stop the instance.

3.   Create a new directory called install in <path-to-installation>/crx-quickstart/ directory.

4.   Copy the downloaded hot fixes to the install directory.

5.   Restart the instance.

6.   Go to the package manager and check whether all the hot-fixes are installed properly or not.