2013 in review

Posted: December 31, 2013 in Uncategorized

The WordPress.com stats helper monkeys prepared a 2013 annual report for this blog.

Here’s an excerpt:

The concert hall at the Sydney Opera House holds 2,700 people. This blog was viewed about 26,000 times in 2013. If it were a concert at Sydney Opera House, it would take about 10 sold-out performances for that many people to see it.

Click here to see the complete report.


What is a Liferay Portal?

Liferay is open source Portal software and it has a free community edition for commercial use. Liferay is an enterprise web platform to build the business solutions.

Liferay comes in two versions:

  1. Community Edition
  2. Enterprise Edition

Liferay Portal is one of the most successful and top Portals available in the present day’s market for developing a website / web application. This portal is made up of hot-deployable plugins called PortletsPortlets form the heart of a Portal.

Following are the benefits of using a Liferay portal:

  • Liferay is open source software
  • Web Content Management
  • Document Management
  • Digital asset management
  • Workflow management
  • Social collaboration suite (Wikis, Blogs, etc.)
  • Supports integration with LDAP
  • Support for Hot deployable plugins, etc.
Features of Liferay Portal:

Following are a few features of Liferay Portal:

  • Runs on most of the application servers and servlet containers, databases, and operating systems.
  • JSR-286 Compliant.
  • 60 portlets pre-bundled Out-of-the-box.
  • Built in Content Management System (CMS) and Collaboration Suite
  • Hot deployable plugins, hence no restart of server required for changes.
  • Personalization of Pages for users.

What is a Portal?

A portal is generally defined as a software platform for building websites and web applications. A portal is a web application that commonly provides personalization, single sign on, content aggregation from different sources, and hosts the presentation layer of information systems. Aggregation is the act of integrating content from different sources within a web page. Present day portals have added many features which help the editors to implement various functionalities from a single platform. The below listed various features are available in the modern day’s portals:

  • Web Content management
  • Document management
  • Digital asset management
  • Workflow management
  • Social collaboration (Communities), etc.

These features are making Portals as one of the best options to be chosen while building a web application / websites.

Portal functionality can be divided into three main parts:

  1. Portlet container: A portlet container is very similar to a servlet container. A portlet container is responsible for initializing and destroying portlets and also for passing user requests to it and collecting responses. It controls the life cycle of the portlet.
  2. Content aggregator: The main job of a portal is to aggregate content generated by various portlets.
  3. Common services:  The common services that you can find in most implementations are:
  • Single sign on: This helps us to get access to all the applications that are deployed in the Portal, once we log into the portal server
  • Personalization:This helps the user to customize his page, so that he can view the applications which he is interested.


What is Dynamic Publishing?

Dynamic publishing is the process of copying assets and their underlying schema from one WebCenter Sites system to another. This Dynamic Publishing is of two types.

1. Mirror to Server : Mirror to Server is the method used to copy database rows to remote dynamic server

2. Real time Publishing : Real time Publishing is the method used to copy assets to remote dynamic server.

What is RealTimePublishing?

RealTime publishing is a dynamic publishing process. In RealTime publishing, this process is broken up into five stages. The System performs all the five steps in an order, to perform the RealTime publishing.

RealTime publishing is the preferred method for publishing. Using the RealTime user interface, an administrator can monitor the progress of a publishing session, bulk publish selected assets using the on demand queue, bulk un-approve the assets that are approved for publishing, cancel publishing process, and redo publishing sessions, etc.

Complete Publishing Mode:

When the destination is configured for complete publishing mode, the process proceeds without interruption.

Delayed Publishing Mode:

When configured for delayed publishing mode, the process pauses before the fourth step. User interaction is needed for the session to complete. It continues to stage 4 only after the administrator selects the Resume button on the “Publish Console” or “Publishing Status” screen.

As the publishing session proceeds, you can monitor the progress of each stage on the ‘Publishing Status’ screen.

Five Stages of Publishing:
1. Gathering data to publish:

a. The WebCenter Sites source system locks the assets that are approved for this publishing session.  This ensures the assets that need to be published from being edited during publishing.

b. The list of assets to be published from source to destination systems are created in a file called MANIFEST. The manifest identifies the assets that must exist together on the destination to prevent broken links and incomplete pages.

2. Serializing data:

a. The WebCenter Sites source system mirrors the following items:

– Asset types
– Tables
– Approved assets

b. The data that needs to be published to the target will be serialized at the source system (i.e, translation into binary format).

3. Sending data to the target:

a. The destination WebCenter Sites database locks assets that are approved for this publishing session. When assets on the target are locked, they cannot be edited.

b. The WebCenter Sites source system sends the serialized data and the manifest file to the destination.

RealTime Publishing

4. Deserializing and saving data:

a. The WebCenter Sites destination system de-serializes (to WebCenterSites format) the mirrored asset types, tables, and approved assets.

b. The destination system’s database updates asset types and tables with the deserialized ones, or adds them as new data.

c. The destination system uses the manifest to determine when to commit assets to its database.

5. Updating page caches:

The destination system completes the publication process, and does the following tasks:

a. To remove the expired pages, the page cachce is flushed.

b. If any new pages are added, they are added to the cached.

In this way, the RealTime publishing works in Oracle WebCenter Sites.


First things first. We need the following the components for integrating Oracle WebCenter Sites Devloper Tools with Eclipse:

  1. Latest Eclipse (Can be downloaded from http://www.eclipse.org/downloads/)
  2. CSDT plugin (Developer tools plugin)
Integrating Developer Tools with Eclipse

By following the below steps, we can integrate the Developer tools provided by Oracle WebCenter Sites with Eclipse.

  1. Download and Install WebCenter Sites JDK.
  2. Download the latest version of Eclipse, and install it.
  3. In the WebCenter Sites distribution package, there is a filde called csdt.zip. Unzip it.package. Open the csdt-eclipse folder and save the com.fatwire.csdt.eclipsecsdt_1.0.0.jar file to the plugins folder under your Eclipse installation
  4. Start your local instance of WebCenter Sites (JDK).
  5. Start Eclipse (eclipse.exe) and configure its settings according to your preferences.
  6. In the Eclipse menu bar, select Window > Open Perspective > Other … > Oracle WebCenter Sites.
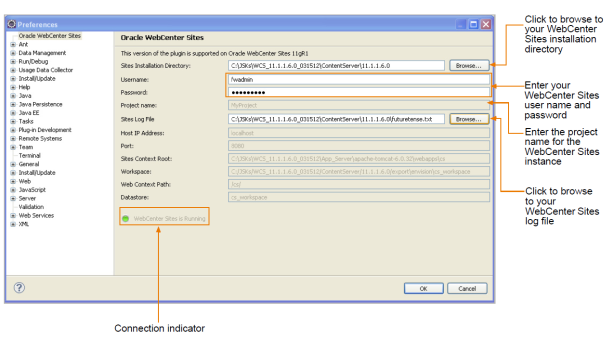
  7. The configuration screen is displayed. In the configuration screen, fill in the following fields with the information for your WebCenter Sites instance
  8. In the “Sites Installation Directory” field, click Browse to select the directory containing the futuretense.ini file for the WebCenter Sites instance.
  9. In the “Username” field, enter the user name of a general administrator. This user must be a member of the RestAdmin group.
  10. In the “Password” field, enter the password for the user name you entered.
  11. In the “Project name” field, enter a name for the project on which you will be working.
  12. In the “Sites Log File” field, enter the location of your log file (for example, C:/ WCS/logs/sites.log).
  13. The Configuration screen looks as below:Config Screen
  14. Click OK.


Configuration is now Complete. Now, the “Oracle WebCenter Sites” perspective opens.  The Oracle WebCenter Sites perspective looks as shown in the below image:

Eclipse IDE

Now you can create and play with templates, elements etc, from eclipse, then sync them with WCS and enjoy coding. Happy Coding 🙂

Related Articles

All the Fatwire / Oracle WebCenter Sites developers are familiar with coding the templates through either Admin interface, or using a text editor such as notepad, etc.  But, Oracle WebCenter Sites provides us with a plugin called DEVELOPER TOOLS (In Fatwire, it was called as CONTENT SERVER DEVELOPER TOOLS plugin), which enables us to work with an Integrated Development Environment like Eclipse. What all we need to do is to use this plugin, and make our work easy by working with Eclipse IDE.

The Developer Tools kit enables developers to work in a distributed environment using tools such as the Eclipse IDE and version control system integration. The developer interacts with Developer Tools (and WebCenter Sites), primarily through Eclipse, which upon integration provides a  set of WebCenter Sites-specific tools for managing assets and other resources.

The Developer Tools kit enables synchronization of resource development in Eclipse with resource development in WebCenter Sites, and resources of WebCenter with resources of Eclipse.

Eclipse Plug-in


USES OF ECLIPSE IDE Integration


There are pretty good usages of integrating the plugin with Eclipse, and coding through Eclipse. Following are the uses through Eclipse integration:

  • Create, edit, and delete Templates, CSElements, and SiteEntries.
  • Develop JSPs with Eclipse features such as tag completion, syntax highlighting, debugging, etc.
  • Export and import assets, asset types, flex families, sites, roles, tree tabs, and start menu items
  • View the output, i.e, Previewing of WebCenter Sites pages within the Eclipse IDE using the preview browser
  • View the WebCenter Sites log file in the error console.


The basic facility that should be provided by a WCM is the ability to add content, save it, and make it available for public usage.

In Day CQ5, these actions can be performed on the AUTHOR INSTANCE.

WHAT IS AUTHOR INSTANCE?

An Author Instance is the facility provided by Adobe Day CQ5 for the content providers. The content providers (otherwise called as Authors) will login to this instance, and manage pages.

Like how we we have contributor interface in Oracle WebCenter Sites / Fatwire, similarly we have an Author Instance in Day CQ5.

What can be done using this Author Instance?

Author can do the following actions like:

  • Create Content
  • Save Content
  • Edit Content
  • Move Content
  • Delete Content, etc.

In the real world implementation, there may be more than one web-site that a company maintains.

For example, lets assume that we have client called “X”. This client has engaged with the Oracle WebCenter Sites developers team to get a Content Management Site created, say http://www.MySiteOne.com . The client has later come up with a requirement to create another site called http://www.MySiteTwo.com using Oracle WebCenter Sites / Fatwire.

To create a new site from scratch, we need to create all the stuff like attribute editors, asset types, templates, elements, etc.

Oracle WebCenter Sites / Fatwire comes with a utility that can be used in such a situation, which will replicate the structure of an existing site (please mind that the first site is also created using Fatwire), and creates a  new site automatically with all the above said stuff such as attribute editors, asset types, templates, elements, etc.

This utility tool provided by Oracle WebCenter Sites is called as SITE LAUNCHER UTILITY.

Site Launcher Overview

To minimize your effort in creating new sites, WebCenter Sites provides a site-replication utility called “Site Launcher.” This utility is designed not for backing up CM sites, but for spinning them off.

Some important points to be noted about the Site Launcher utility.

  1. Site Launcher replicates source sites directly on their native WebCenter Sites system, reusing the existing database schema. The sites are replicated quickly and easily, without the need for coding.
  2. Site replication can be carried out only by the general administrator.
  3. We can either copy or share the assets (templates, asset types, attributes, etc) between both the sites.
  4. While COPY of assets will create a new set of assets into the site, SHARING will share the same asset between both the sites
  5. In the new site, we can remove the existing assets, or add new assets according to the requirements
  6. New asset types, templates, elements etc can be created in the new site.
  7. New users can be created for the newly created site.
  8. Site Launcher can be used to replicate almost any CM site: small, large, functional,incomplete, independent of other sites, and overlapping other sites by the sharing of components.


In Information Technology, no software stands and plays alone for a long time. There are number of new technologies coming these days, getting popular, well noticed by customers / clients. But after some time, a day comes where these technologies are dominated by other technologies.

Coming to the Content Management Systems, there are many niche players like EMC, Oracle, etc. And Adobe joined them by redesigning Communique 4. It has released ADOBE DAY CQ5, basing on Communiqué 4. ADOBE DAY CQ5 is a new WEB EXPERIENCE MANAGEMENT SYSTEM.

What is Adobe Experience Manager?

Adobe Experience Manager helps you organize and manage the delivery of creative assets and other content across your digital marketing channels, including web, mobile, email, communities, and video.

Similar to Oracle WebCenter Sites,  ADOBE DAY CQ5 helps us to build compelling content-centric applications that combine Web Content Management, Workflow Management, Digital Asset Management and Collaboration sites.

Prerequisites for development within CQ

For the developers,  to build WEM site using the Day CQ5, following technologies are required:

  • HTML
  • CSS
  • JavaScript
  • JSP

The documentation for Adobe Day CQ5 can be accessed from http://dev.day.com/docs/en.html

I’m now starting with Day CQ5, and will be updating topics on Day CQ5 from now on.

ADOBE DAY CQ5


In Oracle WebCenter Sites, when we create a site, few tables will be created by the Content Server.  These tables will be used by the CS to write information about the sites that are created in the system. Following are the tables that will be created.

  1. Publication Table
  2. PublicationTree Table
  3. SitePlanTree Table
Publication Table:

This table is used by the CS to store all the info related to the sites that are created in your system. This holds the information like NAME, DESCRIPTION, PUBLICATION ID of the site. Each row in this table resembles a site in your system, and its information.

publication table

PublicationTree Table:

This table is used by the CS to store the information about the asset types that are enabled for your site.  It stores the information about the different asset types that you have created  / shared from other sites in your system.

SitePlanTree Table: 

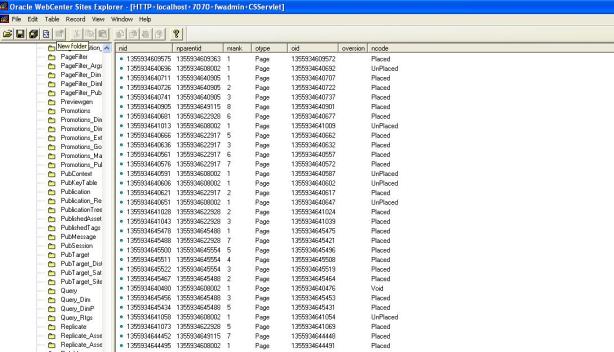
This table stores information about the hierarchical structure of a site and its page assets. This table lists sites and page assets. We can code your CSElements to extract and display information from the SitePlanTree table

There will be a top level node (Page), which will have the rest of the pages placed below it.

The SitePlan in the Admin console of WCS resembles this table in database.

SitePlanTree table

Image  —  Posted: August 26, 2013 in Fatwire
Tags: , , , , , , , ,